FL Studio 20: Dive into the world of music production with this powerful DAW! From crafting killer beats to mastering your tracks, FL Studio 20 offers a comprehensive suite of tools for musicians of all levels. Whether you’re a seasoned pro or just starting out, this guide will walk you through everything from the basic interface to advanced techniques, helping you unlock your creative potential.
We’ll cover everything from the fundamentals of MIDI editing and plugin management to mastering the art of mixing and automation. We’ll even break down how to build a simple beat from scratch and then explore more advanced concepts like sidechaining and sound layering. Get ready to level up your music game!
FL Studio 20 Interface Overview
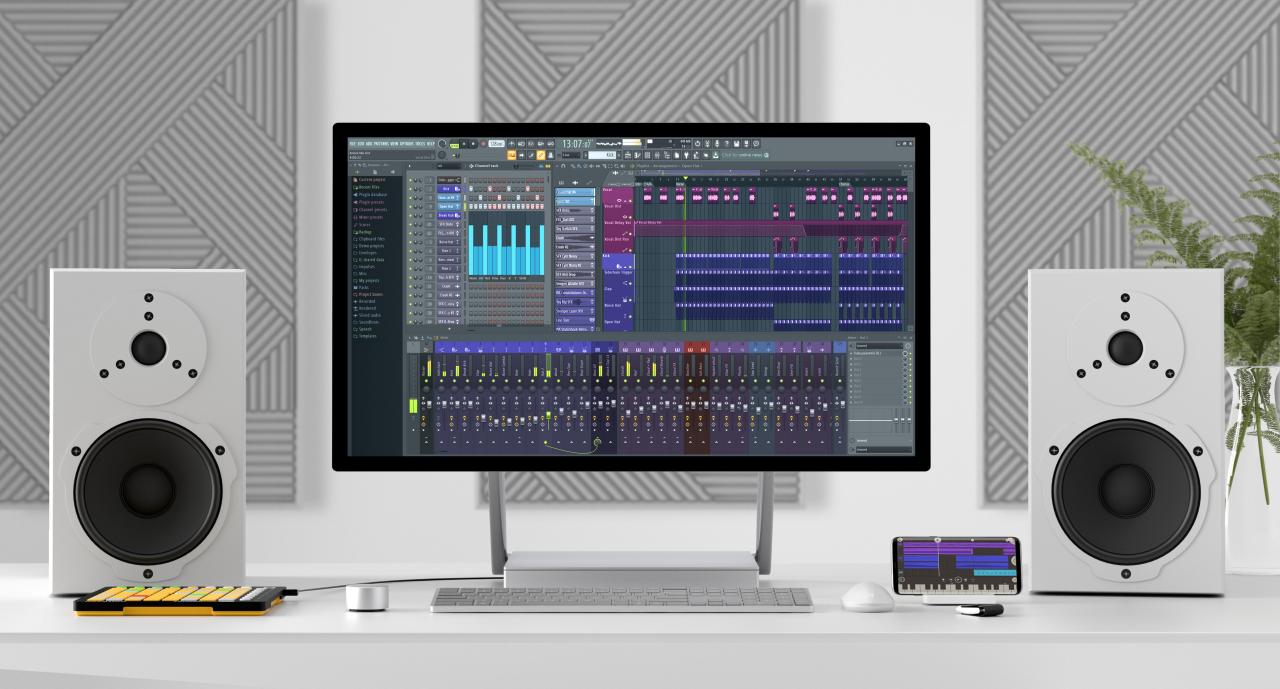
Okay, so we’ve got the intro and outro handled, right? Now let’s dive into the nitty-gritty of FL Studio 20’s interface. It’s a pretty powerful DAW, and understanding its layout is key to unlocking its full potential. This isn’t your grandma’s sequencer; it’s a fully customizable beast.FL Studio 20’s interface represents a significant evolution from previous versions, offering a more streamlined and intuitive workflow, especially for users migrating from older versions.
While maintaining its core functionality, Image-Line has focused on enhancing usability and responsiveness, addressing some of the criticisms levied against earlier iterations. The overall feel is cleaner, more modern, and less cluttered, making it easier to navigate even complex projects. Think of it as a major UI/UX overhaul, but without losing that familiar FL Studio vibe.
FL Studio 20 Panel Descriptions
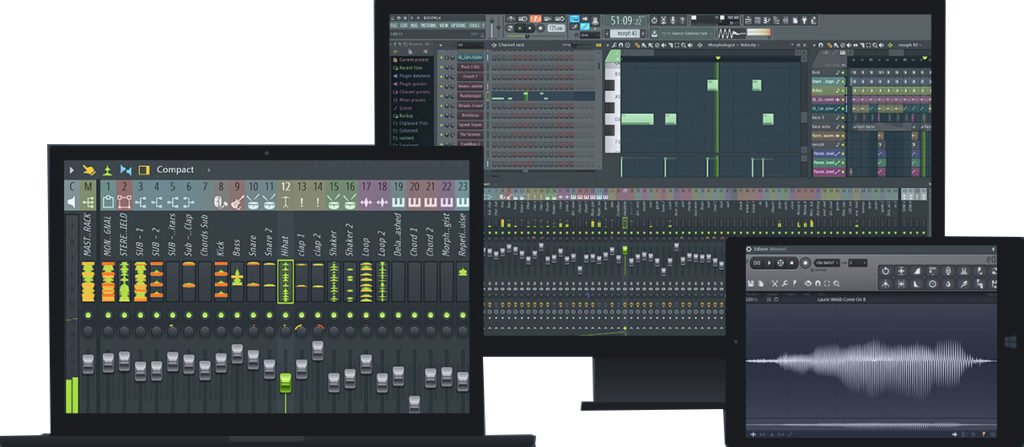
The FL Studio 20 interface is composed of several key panels, each serving a distinct purpose. Understanding their individual functions is crucial for efficient music production. The arrangement is highly customizable, allowing users to tailor the workspace to their preferences.
| Panel Name | Purpose | Usage | Notable Features |
|---|---|---|---|
| Channel Rack | Sequencing and arranging MIDI and audio clips | Create and edit MIDI notes, automation clips, and arrange audio samples. This is where you build your song’s structure. | Piano roll editor, event list, clip properties |
| Playlist | Arranging patterns and clips into a song | Drag and drop patterns and clips to create your song’s arrangement. Think of it as your timeline. | Time stretching and pitch shifting tools, pattern/clip editing capabilities |
| Mixer | Mixing and mastering audio | Adjust levels, EQ, compression, and other effects on individual tracks and the master bus. This is where you shape your sound. | Channel strips, effects routing, sends and returns, master section |
| Browser | Accessing samples, plugins, and presets | Navigate your sample library, find plugins, and load presets quickly and easily. This is your digital toolbox. | Tagging and searching capabilities, drag-and-drop functionality |
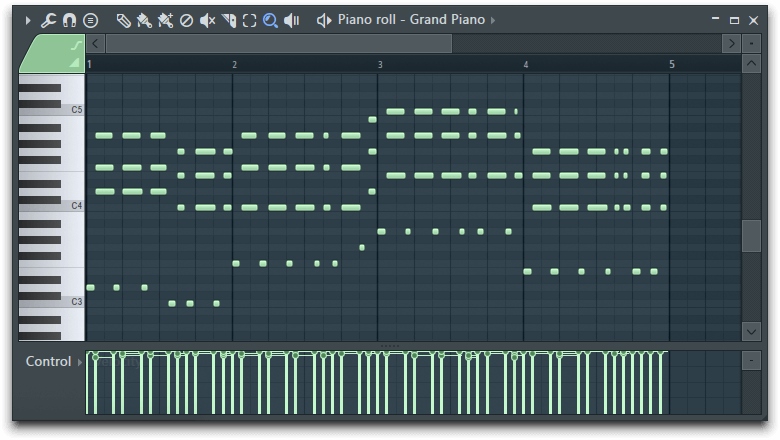
| Piano Roll | Editing MIDI notes | This is a detailed editor for manipulating individual MIDI notes, velocity, and other parameters. It’s where you meticulously craft melodies and rhythms. | Note editing tools, velocity and automation lanes, chord recognition |
| Pattern Editor | Creating and editing musical patterns | Similar to the piano roll but focused on creating repetitive musical phrases that can be arranged in the playlist. | Step sequencer, note entry, automation |
MIDI Editing in FL Studio 20

Okay, so you’ve got your intro and interface down pat. Now let’s dive into the meat and potatoes of FL Studio 20: MIDI editing. This is where you bring your musical ideas to life, shaping melodies, rhythms, and harmonies with the precision of a digital sculptor. We’ll cover creating sequences, manipulating MIDI data, and even messing around with some cool MIDI effects.MIDI editing in FL Studio is all about working with those little notes and controllers that tell your virtual instruments what to play.
It’s incredibly versatile and allows for a level of control that’s hard to match. You’ll be surprised how much you can do, from simple melodies to complex, layered arrangements.
Creating and Editing MIDI Sequences
The Piano Roll is your primary tool here. Think of it as a digital sheet of music. You can input notes directly by clicking on the grid, drawing them in with your mouse, or using a MIDI keyboard. Each vertical line represents a beat or a fraction of a beat, depending on your project’s tempo and time signature.
Horizontal lines represent different notes on the musical scale. Editing is just as intuitive – drag notes to change their pitch or duration, or delete them altogether. You can also use the tools to easily quantize your notes, snapping them to the grid for perfectly timed performances. This is crucial for maintaining rhythmic accuracy and creating professional-sounding tracks.
Manipulating MIDI Data with FL Studio Tools
FL Studio provides a wealth of tools to fine-tune your MIDI data. The Piano Roll’s editing features go beyond simple note placement. You can adjust velocity (how hard a note is played, affecting volume and dynamics), aftertouch (for expressive nuances), and even control parameters of your synths and effects directly from the MIDI data. The “Event List” provides a more numerical approach, allowing for precise manipulation of individual MIDI events, such as note-on, note-off, and controller changes.
This is particularly useful for complex automation or when you need very fine-grained control. Think of it as the “under the hood” level of editing, where you can literally tweak every little detail of your MIDI data.
Utilizing MIDI Effects
MIDI effects don’t directly alter the sound of your audio; instead, they modify the MIDI data itself before it reaches your instruments. This opens up a whole new world of creative possibilities. For example, a “Randomizer” effect can add subtle variations to your notes, making your melodies feel more human and less robotic. An “Arpeggiator” transforms simple chords into melodic sequences, adding rhythmic complexity.
A “Chord Generator” can automatically create harmonies based on your input, and a “Transposer” can shift your entire MIDI sequence up or down in pitch. These are just a few examples – FL Studio offers a range of MIDI effects that can dramatically transform your compositions. Imagine using an arpeggiator on a simple bassline to create a complex, driving rhythm.
Or using a randomizer on a drum pattern to inject some spontaneity. The possibilities are endless!
Working with Plugins in FL Studio 20
Okay, so you’ve got the basics of FL Studio down – now let’s dive into the real fun: plugins! Plugins are essentially the secret sauce that lets you transform basic sounds into something truly epic. They add everything from crazy synth sounds to subtle reverb and delay effects. This section will cover how to install and use them effectively.Plugins are the heart and soul of any DAW, and FL Studio is no exception.
They allow you to expand the sonic possibilities of your projects exponentially, offering a vast array of sounds and effects to shape your music. Understanding how to manage and utilize them effectively is key to unlocking your full creative potential within FL Studio.
Installing and Configuring VST Plugins
Installing VST plugins in FL Studio is usually pretty straightforward. First, download your chosen plugin from a reputable source. Once downloaded, most plugins will come as a `.dll` file (on Windows) or a `.vst` or `.vst3` file (on macOS). Next, you need to locate FL Studio’s plugin directory. This is typically found within the FL Studio installation folder, often in a subfolder labeled “Plugins” or similar.
Simply copy the downloaded plugin file into this directory. Restart FL Studio, and the plugin should now be available in your browser. Some plugins may require additional configuration or authorization, which will be detailed in their respective installation guides. If you’re having trouble, checking the plugin developer’s website for specific instructions is always a good idea.
Advantages and Disadvantages of Different Plugin Types
Synthesizers (synths) are plugins that generate sound. They range from simple oscillators to complex, multi-layered beasts capable of producing incredibly detailed and expressive sounds. Advantages include the ability to create completely unique sounds, control over every aspect of sound generation, and a wide range of sonic possibilities. Disadvantages can include a steeper learning curve for more complex synths, and the potential for overwhelming choices if you’re just starting out.Effects plugins, on the other hand, modify existing sounds.
These can include reverb (simulating the sound of a space), delay (creating echoes), distortion (adding grit and edge), compression (controlling dynamic range), and EQ (shaping the frequency balance). Advantages of effects plugins are their ability to enhance and polish your sounds, add character and texture, and correct flaws in recordings. Disadvantages might be that overusing effects can muddy your mix or make it sound unnatural.
Finding the right balance is key.
Commonly Used Plugins by Genre
Understanding which plugins are popular in different genres can help you focus your plugin acquisition strategy.The following list showcases some popular plugin types and examples:
Electronic Dance Music (EDM): EDM producers often rely on a powerful combination of synthesizers and effects to craft their soundscapes.
- Synthesizzers: Serum (Xfer Records), Massive (Native Instruments), Sylenth1 (LennarDigital)
- Effects: Ozone (iZotope), ValhallaRoom (Valhalla DSP), FabFilter Pro-Q 3 (FabFilter)
Hip Hop: Hip hop production often centers around powerful 808s, crisp snares, and punchy samples. Plugins play a crucial role in shaping these elements.
- Samplers: Kontakt (Native Instruments), Battery (Native Instruments)
- Effects: Waves plugins (various), SSL plugins (Solid State Logic)
Pop: Pop music production often uses a balance of polished sounds and creative effects to create radio-ready tracks.
- Synthesizers: Diva (u-he), Omnisphere (Spectrasonics)
- Effects: Waves plugins (various), Logic Pro X stock plugins
This is just a small sampling, and many other excellent plugins exist for each genre. Experimentation is key to finding the tools that best suit your creative process.
Automation in FL Studio 20
Automation in FL Studio 20 is like adding a secret sauce to your tracks – it lets you dynamically control pretty much any parameter over time, bringing your music to life. Think of it as adding expression and nuance beyond what you can achieve with static settings. Instead of a track just playing at the same volume and pan the whole time, automation lets you sculpt the sonic landscape, creating subtle shifts or dramatic swells.
It’s a game-changer for crafting truly compelling and professional-sounding music.Automation empowers you to create movement and interest in your tracks. By manipulating parameters like volume, pan, effects sends, and even plugin parameters, you can build dynamic soundscapes and inject emotion into your productions. This is far more engaging than static mixes. Mastering automation unlocks a whole new level of creative control.
Creating Automation Clips
FL Studio offers several intuitive methods for creating automation clips. The most common involves drawing automation directly onto the piano roll. You simply select the parameter you want to automate (like volume or a plugin knob), and then draw the automation curve directly onto the piano roll’s display. This gives you precise control over how the parameter changes over time.
Another approach involves using the automation clip itself, which acts as a separate track in your project. This provides a clear visual representation of the automation data. You can edit these clips using various tools, including drawing curves, inserting keyframes, and using automation envelopes.
Dynamic Musical Arrangements Through Automation
Automation isn’t just about subtle tweaks; it’s a powerful tool for shaping the overall structure and feel of your tracks. For example, you could automate the volume of a synth pad to create a gradual build-up to a drop, adding suspense and excitement. Similarly, automating the pan of a lead instrument can create a sense of movement and space, making the track more interesting to listen to.
Consider automating the cutoff frequency of a filter to create a dramatic sweep, or the delay time of an effect to create rhythmic echoes. The possibilities are endless.
Examples of Effective Automation Techniques
Let’s explore some specific examples of how automation can enhance different musical parameters:
- Volume Automation: A classic use is creating a build-up to a drop in a dance track. You might start with a low volume, gradually increase it over several bars, and then suddenly hit a peak at the drop. This controlled rise in volume creates anticipation and impact. Alternatively, you could use subtle volume automation to create a breathing effect on a vocal line, making it feel more natural and expressive.
- Pan Automation: Panning automation can add width and depth to your mixes. For instance, you could automate the pan of a synth to sweep it across the stereo field, creating a sense of movement. This is especially effective for creating a wider soundstage for your instruments. You could also subtly automate the pan of a vocal to add a subtle rhythmic feel.
FL Studio 20 is seriously powerful, but getting the most out of it depends on your workflow. A solid workflow, whether it’s linear or more experimental, is key to maximizing your productivity and avoiding frustrating creative blocks. Once you nail down a good system, you’ll find yourself cranking out tracks in FL Studio 20 way faster.
- Effects Automation: Automating effects parameters can add texture and dynamism to your tracks. For example, automating the wet/dry mix of a reverb can create a sense of space that evolves over time. Similarly, automating the feedback on a delay can create rhythmic echoes that punctuate the track. You could even automate the cutoff frequency of a filter on a synth to create interesting sonic textures.
Mixing and Mastering in FL Studio 20
Mixing and mastering are crucial final steps in music production, transforming individual tracks into a cohesive and polished final product. In FL Studio 20, these processes leverage its powerful mixing console and mastering effects to achieve professional-sounding results. This section will Artikel workflows for both mixing and mastering, highlighting key techniques and considerations.
Mixing Workflow in FL Studio 20
Mixing involves balancing individual tracks, creating a stereo image, and ensuring clarity and punch. A typical workflow begins with gain staging, where each track’s volume is adjusted to a suitable level before applying any processing. This prevents clipping and maximizes headroom. Following gain staging, EQ, compression, and other effects are applied to shape the sound of individual tracks and create a balanced mix.
EQ Techniques in Mixing
Equalization (EQ) is used to adjust the frequency balance of individual tracks. High-frequency EQ boosts can add brightness and air, while low-frequency cuts can remove muddiness. Conversely, low-frequency boosts can add warmth and fullness, and high-frequency cuts can reduce harshness. Careful EQing ensures that each instrument occupies its own space in the frequency spectrum, preventing masking and improving clarity.
For example, a bass guitar might require a low-frequency boost and high-frequency cut to avoid clashing with the kick drum.
Compression in Mixing
Compression is used to control the dynamic range of a signal, making it sound louder and more consistent. This involves reducing the volume of the loudest peaks while leaving the quieter parts relatively untouched. Different compression settings can produce varying effects; for instance, a high ratio with fast attack and release will create a “pumping” effect, while a lower ratio with slower attack and release will result in a more subtle, natural compression.
Careful use of compression can add punch and sustain to drums, glue together elements of a mix, and control the dynamics of vocals.
Other Mixing Techniques, Fl studio 20
Beyond EQ and compression, several other techniques contribute to a well-mixed track. These include using reverb and delay to add depth and space, using saturation to add warmth and harmonic richness, and employing stereo widening techniques to create a wider soundstage. Panning instruments across the stereo field can also enhance the mix’s spaciousness and interest. Careful use of these effects can significantly improve the overall quality and listenability of a mix.
Mastering Workflow in FL Studio 20
Mastering is the final stage of audio production, focusing on optimizing the overall sound of the mix for various playback systems. It involves adjustments to loudness, dynamics, and stereo imaging to create a cohesive and impactful final product. A common approach involves using a mastering limiter to control the overall loudness, while subtle EQ and compression are used to refine the balance and add polish.
Loudness and Dynamics in Mastering
Mastering often aims for a target loudness level, typically measured in LUFS (Loudness Units relative to Full Scale). This ensures consistency across different platforms and prevents the track from sounding too quiet or too loud. However, excessive loudness can lead to dynamic compression, making the track sound less dynamic and potentially harsh. A balance must be struck between achieving sufficient loudness and preserving the track’s dynamic range.
Modern mastering often prioritizes perceived loudness over absolute loudness, aiming for a clear and impactful sound without sacrificing dynamic range.
Mastering Techniques Comparison
Different mastering techniques can significantly impact the final sound. For example, using a limiter with a high ceiling will result in a louder track, but may also lead to dynamic compression and a less nuanced sound. Conversely, using a limiter with a lower ceiling and more gentle compression will preserve more dynamics, but may result in a quieter track.
The choice of mastering techniques depends on the specific musical style and the desired aesthetic. Some engineers favor a transparent mastering approach that preserves the original mix’s character, while others prefer a more aggressive approach that emphasizes loudness and punch.
FL Studio 20’s Sampler Functionality
FL Studio’s built-in sampler, a powerful tool often overlooked, lets you chop, manipulate, and creatively use audio samples within your productions. It’s incredibly versatile, allowing for everything from simple drum one-shots to complex, layered textures and evolving soundscapes. Understanding its capabilities can unlock a whole new level of sonic exploration in your music.The sampler is seamlessly integrated into FL Studio’s workflow, making it easy to incorporate into your projects.
It offers a straightforward interface for loading, editing, and manipulating audio samples, with advanced features available for those seeking more control. This means whether you’re a beginner or a seasoned producer, you’ll find the sampler intuitive and useful.
Loading and Managing Samples
Loading samples into FL Studio’s sampler is a breeze. Simply drag and drop your audio file directly onto a sampler channel in the Channel Rack. Alternatively, you can use the browser to locate and load your samples. Once loaded, you’ll see a waveform display showing the audio data. The sampler allows for multiple sample loading, enabling complex layering and manipulation techniques.
You can manage samples by creating folders and organizing them within the sampler’s interface for easy access. This organizational aspect is crucial for managing large sample libraries efficiently.
Editing and Manipulating Samples
The sampler provides comprehensive editing tools. You can easily trim samples to remove unwanted sections, loop sections for rhythmic patterns, or adjust the sample’s start and end points for precise control. Advanced features like time-stretching and pitch-shifting are also available, allowing for creative manipulation of the audio without altering its tonal quality significantly. The sampler also includes envelope controls for manipulating parameters such as volume, pan, and filter cutoff over time, allowing for dynamic and evolving sounds.
For example, you could create a riser effect by slowly increasing the volume and filter cutoff over several seconds.
Sampling Techniques and Applications
Various sampling techniques can dramatically alter a sample’s character and application in a track. For instance, “chopping” a sample involves slicing it into smaller segments, often used for creating drum breaks or rhythmic patterns. This technique is commonly used in hip-hop and electronic music. “Looping” a sample, as previously mentioned, repeats a section continuously, perfect for creating basslines, melodic phrases, or rhythmic grooves.
“Time-stretching” allows you to alter the sample’s duration without changing its pitch, useful for fitting samples into different tempos. “Pitch-shifting” changes the pitch without affecting the sample’s duration, enabling the creation of unique melodic variations or harmonies. Finally, “granular synthesis,” a more advanced technique, breaks the sample into tiny grains, which can be manipulated individually to create evolving textures and soundscapes.
This can produce otherworldly sounds that would be impossible to create with traditional instruments. Imagine using granular synthesis on a field recording of birdsong to create an ethereal pad.
Creating a Simple Beat in FL Studio 20
Alright, so you’ve got FL Studio open and you’re ready to make some fire beats. This tutorial will walk you through creating a basic four-on-the-floor beat, the backbone of countless tracks. We’ll cover setting up the tempo and time signature, selecting some killer drum sounds, and getting those beats locked in. Let’s get started!
Setting Up the Project
First things first, we need to set up our project. Open a new project in FL Studio. In the top bar, you’ll find the “Options” menu. Navigate to “Project Settings” and then click on “General.” Here, you can set your tempo. Let’s go with a standard 120 BPM (beats per minute).
This is a good starting point for many genres. While you’re in the Project Settings, confirm your time signature is set to 4/4 (four beats per measure, each beat a quarter note). This is the most common time signature for hip-hop, pop, and many other genres. This sets the foundational grid for your beat.
Selecting and Placing Drum Sounds
Now, let’s get some sounds cooking. FL Studio comes with a bunch of great stock sounds, but you can also use your own samples or VST plugins. Let’s focus on the basic four-on-the-floor: kick, snare, hi-hat, and closed hi-hat. Locate the Channel Rack. This is where you’ll place your drum sounds.
We’ll use the stock “Fruity Loops” drum kit for simplicity. Drag and drop a kick drum sound onto a channel. Do the same for a snare, hi-hat, and closed hi-hat. Each sound should reside on a separate channel. You might need to adjust the panning of your sounds to fit the mix.
A common approach is to pan the hi-hats slightly to the left and right.
Programming the Beat
Time to get those drums in the pocket. In the Piano Roll, which you access by double-clicking on a drum channel, you’ll see a grid representing the beats and measures. Program your kick drum on every beat (1, 2, 3, 4). For the snare, place it on beats 2 and 4. For the hi-hat, program a closed hi-hat on every beat and an open hi-hat on beats 2 and 4.
This is a basic pattern, but you can experiment with variations. For example, you might add some ghost notes or alter the velocity (volume) of certain hits. Experiment with these parameters to create variations in your drum patterns. Remember, you can always undo and redo your actions if you don’t like the result.
Fine-Tuning and Mixing
Once you have your basic beat programmed, it’s time to fine-tune the sounds and mix them together. Adjust the volume levels of each drum sound to achieve a balanced mix. Experiment with the panning, EQ, and compression of each sound. You can use the mixer in FL Studio to adjust these parameters. The goal is to create a clear, punchy beat that is pleasing to the ear.
Pay attention to the overall balance and ensure no single element overwhelms the others. A balanced mix will result in a much better-sounding track.
Advanced Techniques in FL Studio 20
Okay, so you’ve got the basics down – you can make a beat, use plugins, and even automate some stuff. Now let’s level up your FL Studio game with some seriously pro techniques. We’re talking about taking your tracks from “good” to “amazing” by mastering advanced mixing and sound design strategies. Think of this as the secret sauce that separates the amateurs from the pros.Sidechaining, layering sounds, and creative effects use are crucial for achieving a polished and professional sound.
Mastering these techniques allows for dynamic and engaging tracks that grab the listener’s attention and keep them hooked. This section will explore these techniques in detail, providing practical examples and explanations to enhance your understanding and workflow.
Sidechaining
Sidechaining is a mixing technique where the volume of one audio track is dynamically controlled by the signal of another. Typically, a bassline’s volume is reduced whenever a kick drum hits, creating a pumping effect. This rhythmic ducking of the bass allows the kick drum to cut through the mix without muddying the low-end. In FL Studio, you can achieve this using a compressor as a sidechain.
You’d route the kick drum’s audio to the sidechain input of the bassline’s compressor. The compressor will then attenuate the bass’s volume whenever the kick drum is playing, creating that signature “pump.” Experiment with the attack and release times of the compressor to fine-tune the effect – a fast attack and a medium release are common starting points.
This technique can also be used with other instruments, such as synths and vocals, to create interesting rhythmic interplay and sonic space. For instance, sidechaining a pad synth to a hi-hat creates a subtle, pulsating effect.
Layering Sounds
Layering involves combining multiple sounds to create a richer, more complex texture. This is often used with synthesizers or sampled instruments to add depth and fullness. For example, you might layer a warm, analog-sounding synth with a brighter, digital synth to create a more interesting sonic palette. Layering can also be used to add subtle nuances and details to a sound, such as adding a subtle delay or reverb to one layer to create a sense of space and depth.
Think of it like adding spices to a dish – a little bit of this and a little bit of that can completely transform the overall flavor. Careful attention to the frequency ranges of the layered sounds is crucial; you want to avoid masking or muddying the frequencies. Strategic EQing can help sculpt the sounds to complement each other effectively.
For instance, one layer might be high-passed to remove low frequencies, while another layer might be low-passed to remove high frequencies.
Creative Effects Use
Beyond the standard reverb and delay, FL Studio offers a vast array of effects that can dramatically alter the character of your sounds. Experimenting with these effects can lead to unexpected and exciting results. For example, using a chorus effect can thicken a lead synth, while a flanger can create a swirling, psychedelic effect. A phaser can add movement and depth, and a distortion effect can add grit and aggression.
Consider using effects in unexpected ways. Try sending a kick drum to a reverb to create a spacious, atmospheric effect, or use a delay to create rhythmic echoes on a vocal sample. The key is to experiment and find what works best for your particular track. Remember that less is often more – using too many effects can muddy your mix and obscure the original sound.
FL Studio 20 Workflow Optimization
Optimizing your workflow in FL Studio 20 is key to maximizing your productivity and creativity. A streamlined process allows you to focus on the music, not the technical hurdles. Understanding common bottlenecks and implementing effective strategies can significantly reduce frustration and increase your output. This section will address common issues and provide practical solutions to enhance your FL Studio experience.
Common Workflow Bottlenecks in FL Studio 20
Several factors can slow down your workflow in FL Studio. These often involve inefficient organization, a lack of keyboard shortcuts, and poor project management practices. Addressing these areas can dramatically improve your overall efficiency. For example, constantly searching for samples or plugins wastes valuable time that could be spent composing. Similarly, a poorly organized project file can lead to confusion and frustration, especially on larger projects.
Improving Efficiency and Productivity
Improving efficiency in FL Studio involves a multi-pronged approach. This includes adopting better organizational habits, learning and utilizing keyboard shortcuts, and employing efficient plugin management techniques. For instance, creating a well-structured folder system for your samples and presets reduces search time significantly. Mastering keyboard shortcuts allows for quicker navigation and manipulation of various elements within the DAW.
Utilizing channel racks efficiently for organization, as well as using automation clips to control parameters smoothly, will increase efficiency.
Best Practices for Optimizing the FL Studio 20 Workflow
Implementing a set of best practices can help establish a consistent and efficient workflow. The following checklist Artikels key areas to focus on:
| Organization | Navigation & Shortcuts | Plugin Management | Project Management |
|---|---|---|---|
| Create a well-structured folder system for samples, presets, and projects. | Learn and utilize frequently used keyboard shortcuts. Refer to FL Studio’s documentation for a complete list. | Regularly update and organize your plugins. Uninstall unused plugins to improve loading times. | Save frequently and use version control (e.g., regular backups). |
| Use descriptive names for tracks, channels, and files. | Utilize the browser effectively for quick access to files and presets. | Categorize plugins by type and function for easy retrieval. | Clearly label and document different sections of your projects. |
| Color-code tracks and channels for visual clarity. | Master the use of FL Studio’s mixer and playlist views. | Consider using a plugin manager for easier organization and updates. | Break down complex projects into smaller, manageable tasks. |
| Regularly clean up unused files and projects. | Utilize the pattern view’s zoom and scrolling features for easier editing. | Regularly scan your plugins for malware and vulnerabilities. | Use templates for frequently used project setups. |
Last Recap
So, there you have it – a whirlwind tour through the exciting world of FL Studio 20! From basic interface navigation to advanced mixing and mastering techniques, we’ve covered a lot of ground. Remember, the key is practice and experimentation. Don’t be afraid to dive in, explore the features, and find your own unique workflow. The possibilities are endless, so get creative and make some noise!
Top FAQs: Fl Studio 20
Is FL Studio 20 compatible with macOS?
Nope, it’s Windows only.
What’s the best way to learn FL Studio 20?
Hands-on practice combined with online tutorials and courses is the most effective method. Experiment!
How much does FL Studio 20 cost?
Check Image-Line’s website for the latest pricing; they offer different licensing options.
Can I use FL Studio 20 for other types of audio production besides music?
Totally! It’s versatile enough for sound design, podcasting, and more.
What are some good free plugins to start with in FL Studio 20?
Lots of great free VSTs are available online. Search for “free VST plugins” and explore – just be sure to download from reputable sources.