WavePad, the surprisingly versatile audio editor, isn’t just for pros. Whether you’re crafting the next viral TikTok hit, polishing up a podcast, or just need to quickly clean up a recording, WavePad offers a surprisingly powerful suite of tools. From basic trimming and splicing to advanced noise reduction and effects, it’s got a lot more under the hood than you might expect.
Let’s dive in and explore what makes this audio editor such a popular choice.
This guide will walk you through WavePad’s core features, from its intuitive interface to its surprisingly robust advanced capabilities. We’ll cover everything from basic editing tasks to more advanced techniques like audio restoration and batch processing. We’ll even show you how to create a simple podcast using WavePad, so get ready to unleash your inner audio wizard!
WavePad’s Core Functionality
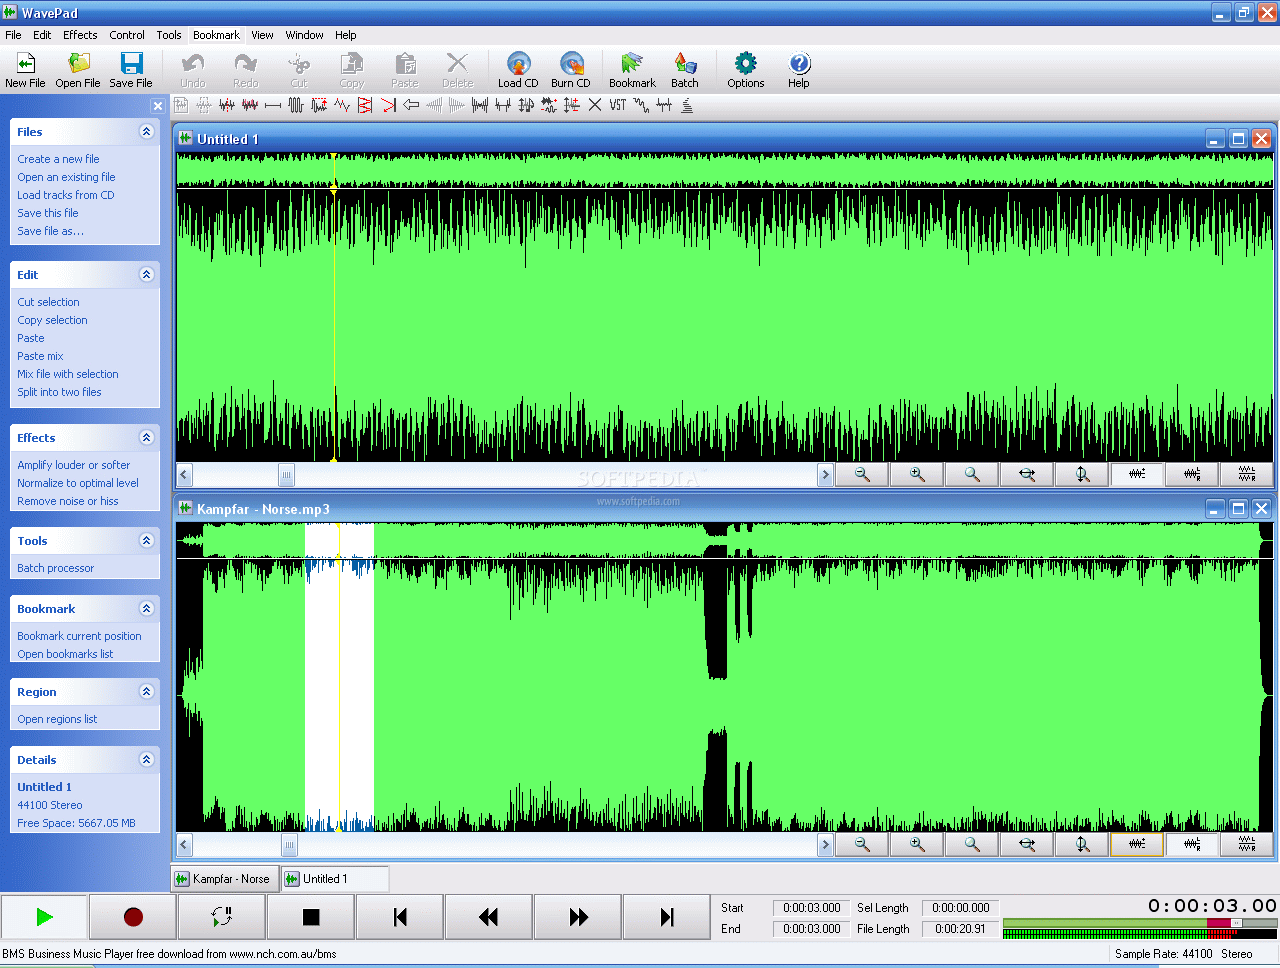
WavePad, a popular audio editing software, offers a surprisingly robust set of features considering its accessibility. It’s a great option for both beginners looking to learn the basics and more experienced users needing a reliable tool for various audio projects. The software balances ease of use with powerful editing capabilities, making it a versatile choice across different skill levels.WavePad’s interface is fairly intuitive, presenting users with a straightforward layout.
The main window displays the audio waveform, allowing for visual manipulation. Basic editing tasks, like cutting, copying, pasting, and deleting audio segments, are accomplished through simple drag-and-drop actions or using keyboard shortcuts. Users can adjust volume levels, apply fades, and add effects directly from the toolbar. The workflow is generally linear: import audio, edit, add effects, export.
This simple design is one of its strengths, making it quick to learn and efficient to use.
Supported File Formats
WavePad boasts wide compatibility with various audio file formats. This ensures that users can work with a broad range of audio sources and easily share their finished projects. The software supports common formats such as WAV, MP3, WMA, OGG, and many more. This broad range of supported formats simplifies the process of importing and exporting audio files, eliminating the need for format conversions in many cases.
For example, a user could easily import an MP3 recording, edit it, and export it as a WAV file for higher quality preservation, or vice-versa depending on their needs. The extensive format support streamlines the entire audio editing workflow.
Advanced Editing Features in WavePad
WavePad offers a surprisingly robust set of advanced audio editing tools, going beyond the basics of cutting and pasting. While not as feature-rich as professional-grade DAWs like Pro Tools or Ableton Live, it packs a punch for its price point, especially for casual users and those needing quick fixes. Its advanced features make it a surprisingly versatile tool for various audio projects.WavePad’s advanced tools empower users to significantly improve audio quality and creatively manipulate sound.
These tools are accessible through intuitive menus and are generally easy to learn, even for those without extensive audio editing experience. This accessibility makes it a great choice for both beginners and intermediate users looking for a powerful yet user-friendly option.
Noise Reduction and Restoration
WavePad’s noise reduction capabilities are quite effective for cleaning up recordings marred by background hiss, hum, or other unwanted sounds. The process involves selecting a section of the audio containing only the noise, then applying the noise reduction effect. WavePad analyzes this noise profile and then attempts to remove similar noise from the rest of the audio. The strength of the effect can be adjusted, allowing for fine-tuning to balance noise reduction with the preservation of the desired audio.
Restoration tools similarly help repair damaged or degraded audio files, though the effectiveness depends heavily on the severity of the damage. For example, a crackle in a vintage recording might be partially mitigated, but severely corrupted sections may require more advanced techniques.
Using WavePad Effects and Filters
Applying effects and filters in WavePad is a straightforward process. Most effects are accessible through the “Effects” menu. For example, to add reverb, you would select the audio segment you want to affect, go to “Effects,” choose “Reverb,” and then adjust parameters such as reverb time and decay. Other effects, such as equalization (EQ), compression, and normalization, allow for precise adjustments to the audio’s frequency balance, dynamics, and overall loudness.
Filters allow for the removal or reduction of specific frequencies. A high-pass filter, for example, removes low-frequency rumble, while a low-pass filter removes high-frequency hiss. Each effect and filter has its own set of adjustable parameters, enabling users to customize the audio to their liking. Experimentation is key to mastering these tools.
Comparison to Other Audio Editing Software
Compared to professional Digital Audio Workstations (DAWs) like Audacity or Adobe Audition, WavePad lacks some advanced features such as MIDI editing, multi-track recording, and advanced automation capabilities. However, for its price point, WavePad’s advanced editing features are quite impressive. Audacity, for instance, offers comparable noise reduction but lacks WavePad’s intuitive interface. Adobe Audition, a professional-grade software, surpasses WavePad in terms of features and power but comes with a significantly higher price tag and steeper learning curve.
WavePad occupies a comfortable middle ground, offering a good balance of features and user-friendliness. It’s a suitable choice for users who don’t need the extensive features of a professional DAW but still want more than basic editing capabilities.
WavePad’s Sound Effects Library

WavePad’s built-in sound effects library is a surprisingly robust feature, offering a wide range of audio enhancements and creative options directly within the program. It’s a great resource for quickly adding polish to your projects without needing to source external sound files. From simple whooshes and impacts to more complex sound design elements, WavePad provides a decent selection ready to be incorporated into your audio creations.
WavePad’s audio editing capabilities are pretty sweet, especially when you’re working on a project that needs a really clean sound. Sometimes though, getting the best audio requires having all your Lenovo laptop’s drivers up to date, so check out this link for lenovo drivers if you’re experiencing any glitches. Once you’ve got those sorted, you can get back to mastering your audio in WavePad.
Let’s dive into how you can use these effects effectively.This section explores examples of WavePad’s built-in sound effects, details a short audio project using only those integrated effects, and categorizes the sound effects based on their common applications. Understanding these aspects will significantly improve your audio editing workflow and unlock the creative potential within WavePad.
Examples of WavePad Sound Effect Usage
WavePad’s sound effects can be applied in various ways, depending on the desired outcome. For instance, the “Whoosh” effect can be used to create a transition between scenes in a podcast, adding a subtle but effective change in mood. Imagine a dramatic shift in the narrative; the whoosh smoothly guides the listener to the next part of the story. Similarly, the “Explosion” sound effect could be used to punctuate a particularly exciting moment in a video game, creating a more impactful and immersive experience.
A subtle “Heartbeat” sound effect could add tension to a suspenseful scene in a film or audio drama. Experimentation is key—these effects can add depth and texture far beyond their simple descriptions.
A Short Audio Project Using WavePad Sound Effects
Let’s create a short, whimsical soundscape using only WavePad’s integrated sound effects. We’ll begin with a gentle “Rain” effect to establish a calm atmosphere. After a few seconds, we’ll introduce the sound of “Birds Chirping” to add a touch of life and tranquility. Then, we’ll layer in a subtle “Wind” effect, creating a gentle breeze. To punctuate the scene, a distant “Thunder” sound effect could be used sparingly.
Finally, we fade the sounds out gradually, leaving the listener with a sense of peaceful closure. This simple project showcases how easily you can blend and layer various effects to create a cohesive and engaging soundscape.
Categorization of WavePad Sound Effects
Organizing WavePad’s sound effects by application greatly streamlines the editing process. We can categorize them into several useful groups:
| Category | Examples | Typical Applications |
|---|---|---|
| Transitions | Whoosh, Click, Reverse Cymbal | Podcast editing, video transitions, scene changes |
| Impacts | Explosion, Gunshot, Crash | Video games, action scenes, dramatic moments |
| Ambient Sounds | Rain, Wind, Birds Chirping, Crowd Noise | Setting the mood or atmosphere in podcasts, videos, and audio dramas |
| Musical Elements | Short musical stings, simple melodic phrases (if available) | Adding emphasis to certain parts of a project, simple background music |
Batch Processing Capabilities of WavePad
WavePad’s batch processing feature is a lifesaver for anyone working with a large number of audio files. Instead of tediously editing each file individually, you can automate repetitive tasks like volume normalization, adding effects, or converting file formats, saving you significant time and effort. This functionality is particularly useful for tasks like podcast post-production, where many episodes might need consistent audio levels.WavePad’s batch processing allows you to apply a series of edits to multiple audio files simultaneously.
This streamlines workflows, improving efficiency and consistency across your audio projects. The process generally involves selecting the files, defining the edits to be applied, and then letting WavePad do the heavy lifting. Understanding how to leverage this feature effectively is crucial for maximizing your productivity.
Applying Edits to Multiple Files
To begin a batch process, you first need to select all the audio files you want to modify. This can usually be done through a file selection dialog box within WavePad’s batch processing interface. Next, you’ll define the edits. This might include tasks like adjusting the volume to a specific level (e.g., -3dB), applying a fade-in and fade-out effect with a specified duration (e.g., 1 second), or converting all files to a particular format (e.g., MP3 at 192kbps).
WavePad’s interface will typically present a list of available editing options, allowing you to customize the process to your specific needs. Once the edits are defined, initiate the batch process, and WavePad will apply the specified changes to all selected files. The processed files will then be saved to a designated output folder, usually allowing you to specify the file naming convention.
Automating Audio Editing Tasks
Automating audio editing in WavePad significantly reduces manual intervention. Imagine needing to normalize the volume of 100 podcast episodes. Manually adjusting each one would be incredibly time-consuming. With batch processing, you simply select all episodes, set the desired volume level (perhaps using a compression algorithm for a more dynamic range), and initiate the batch process. WavePad will then automatically adjust the volume of every episode to the specified level, maintaining consistency across your entire podcast series.
This same principle applies to other tasks such as applying noise reduction, adding reverb, or changing the bitrate. The key is to define the edits once and then apply them to all files simultaneously.
Limitations of WavePad’s Batch Processing
While WavePad’s batch processing is a powerful tool, it does have some limitations. One common limitation is the lack of advanced conditional logic. For instance, you might not be able to apply different edits based on the characteristics of individual audio files (e.g., applying different compression settings based on the file’s peak level). The batch process typically applies the same edits uniformly across all selected files.
Another limitation could be the processing speed, particularly when dealing with very large files or a very high number of files. The time it takes to complete a batch process will naturally depend on the complexity of the edits and the processing power of your computer. Finally, some advanced editing features might not be accessible through the batch processing interface, requiring manual editing for those specific instances.
WavePad’s Voice Recording Functionality
WavePad’s built-in recording capabilities are surprisingly robust, making it a viable option for quick voice memos, podcasting prep, or even basic voice-over work. While not a dedicated voice recorder like Audacity or Adobe Audition, its ease of use and integration with its other features make it a convenient choice for many users. Let’s dive into how it works.The process of recording audio in WavePad is straightforward.
You simply click the large, red “Record” button located prominently in the interface. Before hitting record, however, you’ll want to adjust some settings to optimize your audio quality. WavePad gives you control over several crucial aspects of the recording process, impacting the final product significantly.
Recording Settings and Their Effects on Audio Quality
WavePad offers several options to customize your recording. Choosing the correct settings directly influences the clarity, fidelity, and overall quality of your recording. The most important settings include the sample rate, bit depth, and channels.The sample rate determines how many times per second WavePad samples the audio signal. Higher sample rates (e.g., 44.1 kHz or 48 kHz) capture more detail, resulting in higher-fidelity audio, but also larger file sizes.
Lower sample rates (e.g., 22.05 kHz) result in smaller files but can lead to a loss of detail and a slightly less natural sound. For most voice recordings, 44.1 kHz is a good balance between quality and file size.Bit depth defines the precision of each sample. Higher bit depths (e.g., 16-bit or 24-bit) offer greater dynamic range and less quantization noise, leading to a cleaner, more nuanced sound.
Lower bit depths (e.g., 8-bit) result in smaller file sizes but at the cost of audible artifacts. 16-bit is generally sufficient for voice recordings.Finally, the number of channels determines whether you record in mono (one channel) or stereo (two channels). Mono recordings are generally sufficient for voice work and result in smaller file sizes. Stereo recordings are more suitable for music or other recordings where spatial information is important.
Comparison to Dedicated Voice Recording Software
While WavePad’s recording functionality is quite capable, dedicated voice recording software like Audacity or Reaper often offer more advanced features and finer control. For instance, these dedicated programs frequently include features like noise reduction and equalization during recording, allowing for real-time improvements to audio quality. They also often have more extensive monitoring options, allowing for more precise level control.
However, WavePad’s simplicity makes it ideal for quick recordings where advanced features aren’t necessary. Its ease of use makes it a better option for users less familiar with audio editing software. The trade-off is that the workflow in dedicated software might be more powerful but also more complex for beginners. Ultimately, the best choice depends on your needs and technical proficiency.
WavePad’s Support for Various Audio Formats
WavePad boasts impressive compatibility with a wide range of audio formats, making it a versatile tool for audio editing. Understanding these formats and their characteristics is key to choosing the best one for your project, balancing audio quality with file size and compatibility. This section will detail WavePad’s supported formats, compare their properties, and discuss their strengths and weaknesses.
Supported Audio Formats and Codecs
WavePad supports a large number of audio formats, each employing specific codecs for compression and decompression. The exact list can vary slightly depending on your WavePad version and operating system, but generally includes the following: WAV (PCM, various bit depths and sample rates), MP3 (various bitrates and encoding options), WMA, AIFF, AU, VOX, GSM, OGG, FLAC, and more.
The codecs used vary depending on the format. For instance, WAV typically uses PCM (Pulse-Code Modulation) encoding, while MP3 uses various lossy compression algorithms. FLAC, on the other hand, is a lossless codec, preserving all audio data.
Advantages and Disadvantages of Different Audio Formats
Choosing the right audio format depends heavily on the intended use. For example, WAV files offer pristine audio quality due to their uncompressed nature, but this comes at the cost of significantly larger file sizes. MP3, being a lossy format, sacrifices some audio quality for smaller file sizes, making it ideal for sharing and streaming. Formats like FLAC offer lossless compression, achieving smaller file sizes than WAV without compromising audio fidelity, though they still tend to be larger than MP3s.
Ogg Vorbis provides a good balance between quality and compression, making it a solid alternative to MP3. The choice often involves a trade-off between audio quality, file size, and compatibility with different devices and software.
Comparison of Audio Quality and File Size
The following table compares the audio quality and file size characteristics of several common audio formats. Note that these are general comparisons, and actual file sizes can vary depending on factors like bitrate, sample rate, and length of the audio.
| Format | Audio Quality | File Size | Typical Use Cases |
|---|---|---|---|
| WAV (PCM) | Excellent (lossless) | Large | Studio recording, mastering, archiving |
| MP3 | Good (lossy) | Small | Music playback, podcasts, online streaming |
| FLAC | Excellent (lossless) | Medium (smaller than WAV) | Archiving high-quality audio, music enthusiasts |
| OGG Vorbis | Good (lossy) | Medium (smaller than WAV, often comparable to MP3) | Online streaming, versatile alternative to MP3 |
Troubleshooting Common WavePad Issues
WavePad, while generally user-friendly, can sometimes throw curveballs. This section Artikels some common problems users encounter and provides straightforward solutions to get you back to editing audio smoothly. Knowing how to navigate these issues will save you time and frustration.
Common WavePad Errors and Their Solutions
It’s helpful to have a quick reference guide for common errors. Knowing what the error message means can often point you directly to the solution. Here are some frequently encountered problems and their fixes.
- Error: “File not found.” This usually means WavePad can’t locate the audio file you’re trying to open. Double-check the file path, ensure the file hasn’t been moved or renamed, and verify that the file extension is correct (.wav, .mp3, etc.).
- Error: “Insufficient memory.” WavePad may encounter this if you’re working with very large audio files or have many programs running simultaneously. Close unnecessary applications, increase your computer’s RAM if possible, and consider working with smaller audio segments instead of a single, massive file.
- Error: “File corrupted.” If WavePad can’t open a file because it’s corrupted, unfortunately, there’s often no easy fix. Try opening the file in another audio editor. If that fails, the file may be beyond repair. Always back up important audio files.
- Problem: Audio playback issues (distortion, crackling, skipping). This could be due to several factors: low system resources (close other programs), driver issues (update your sound card drivers), or problems with the audio file itself (try a different file). If the issue is only with a specific file, the file might be corrupted.
- Problem: Effects not applying correctly. Ensure you’ve selected the correct audio segment before applying effects. Sometimes, subtle adjustments to the effect parameters are needed to achieve the desired outcome. Experiment with different settings.
- Problem: Difficulty saving files. Make sure you have sufficient disk space available. Try saving the file to a different location. If you encounter a specific error message during saving, consult WavePad’s help documentation for that particular error code.
Understanding WavePad’s Error Messages
WavePad’s error messages can sometimes be cryptic. Understanding what they generally indicate can be crucial in troubleshooting. While specific messages vary, many fall into broad categories like file errors (as described above), memory errors (also detailed above), and format incompatibility errors (meaning the audio file type isn’t supported). Checking WavePad’s help files or online forums often reveals solutions for specific error codes.
For instance, a message about a “codec error” might indicate a missing or outdated audio codec needs to be installed or updated.
Comparing WavePad to Other Audio Editors

WavePad, while a solid option for many audio editing needs, isn’t the only game in town. To truly understand its place in the market, we need to compare its features and performance against other popular audio editors. This comparison will highlight WavePad’s strengths and weaknesses, helping you decide if it’s the right tool for your audio projects.WavePad’s accessibility and ease of use are major selling points, particularly for beginners.
However, professional-grade features and advanced functionalities found in more expensive software packages might be lacking. This comparison will focus on key aspects like editing capabilities, sound effects, and overall workflow to give you a clearer picture.
Feature Comparison of WavePad and Other Audio Editors
The following table summarizes key differences between WavePad and several popular competitors, including Audacity (a free, open-source option), Adobe Audition (a professional-grade program), and GarageBand (Apple’s integrated DAW). These represent a range of price points and feature sets, allowing for a comprehensive comparison.
| Feature | WavePad | Audacity | Adobe Audition | GarageBand |
|---|---|---|---|---|
| Price | Paid (with free trial) | Free | Subscription-based | Included with macOS |
| Ease of Use | Beginner-friendly | Relatively easy to learn | Steeper learning curve | Intuitive interface |
| Advanced Editing Features | Good selection, but less comprehensive than others | Good selection of basic and some advanced features | Extensive and powerful features | Solid selection of features for Mac users |
| Sound Effects Library | Built-in library, but limited compared to others | Requires downloading additional plugins/effects | Extensive library of high-quality effects | Good selection of built-in effects |
| Batch Processing | Available | Available through plugins or scripting | Robust batch processing capabilities | Limited batch processing capabilities |
| Support for Audio Formats | Wide range of formats supported | Wide range of formats supported | Excellent format support | Good format support |
| Platform Compatibility | Windows and macOS | Windows, macOS, Linux | Windows and macOS | macOS only |
WavePad’s Strengths and Weaknesses
WavePad excels in its ease of use and intuitive interface, making it an excellent choice for beginners and those needing a straightforward audio editor. Its wide format support and availability on both Windows and macOS also add to its appeal. However, its lack of advanced features compared to professional-grade software like Adobe Audition limits its suitability for complex projects requiring high-level manipulation and mastering.
While it offers batch processing, the capabilities are less robust than those found in dedicated professional software. The sound effects library, though present, is also less extensive than those offered by competitors.
WavePad’s System Requirements and Compatibility
WavePad, while generally a pretty lightweight audio editor, still needs a minimum level of system resources to run smoothly. Its compatibility across different operating systems and hardware also varies, impacting performance and the features available. Understanding these requirements ensures a hassle-free editing experience.WavePad’s system requirements are designed to accommodate a wide range of computers, from older machines to modern high-powered systems.
However, the complexity of your projects and the desired speed of processing will influence which system specifications are most appropriate for you. Higher-resolution audio files, extensive use of effects, and complex editing operations will naturally demand more processing power and memory.
Minimum System Requirements
Meeting the minimum system requirements ensures that WavePad will run, but performance may be sluggish, especially with large or complex audio files. Expect longer processing times for effects and potentially some limitations in the features you can use effectively. For example, real-time effects might be noticeably delayed or unavailable on a system barely meeting the minimum requirements. The minimum specifications are a baseline; exceeding them significantly enhances the user experience.
Recommended System Requirements
The recommended system requirements provide a much smoother and more efficient WavePad experience. With these specifications, you can expect faster processing times for effects, seamless playback of high-resolution audio, and the ability to use more advanced features without performance bottlenecks. For instance, rendering long audio files with numerous effects will be significantly quicker, and you’ll be able to handle larger projects without encountering frustrating lags or crashes.
These recommendations represent a balanced approach between performance and affordability.
Operating System Compatibility
WavePad supports both Windows and macOS operating systems. However, the specific version of WavePad you use will determine the exact operating system versions it supports. Generally, newer versions tend to support more recent operating systems and may drop support for older ones. For example, a very recent version might require Windows 10 or 11, while an older version might still work with Windows 7.
Similarly, compatibility with different macOS versions will also depend on the WavePad version. Checking the software’s system requirements before installation is crucial.
Hardware Configuration Limitations
While WavePad is relatively versatile in terms of hardware compatibility, limitations can arise. Older hardware, especially with limited RAM and processing power, will struggle with larger audio files and complex editing tasks. For instance, trying to apply numerous effects to a high-resolution, multi-track project on a low-end machine could lead to significant lag, crashes, or even system freezes.
Likewise, the speed of your hard drive can impact performance, particularly when working with large files or saving projects. Solid-state drives (SSDs) offer a substantial performance advantage over traditional hard disk drives (HDDs) in this context.
Creating a Simple Podcast using WavePad
WavePad, while not a dedicated podcasting platform, offers a surprisingly robust set of tools for creating basic podcast episodes. Its ease of use makes it a great option for beginners wanting to dip their toes into podcasting without investing in complex software. This guide walks you through a simple podcast creation process, focusing on essential steps and settings.
Recording Your Podcast Audio
Before diving into editing, you’ll need your audio. WavePad’s built-in recording capabilities are straightforward. Open WavePad, select the “Record” button, and choose your recording device (microphone). Adjust your input levels to avoid clipping (distortion from overly loud signals). A good practice is to record a test segment to ensure your audio levels are optimal.
Aim for a consistent volume throughout your recording. After the recording is complete, you will see your audio waveform in WavePad’s interface.
Editing Your Podcast Audio
This stage involves cleaning up your recording and adding any necessary elements. Basic editing tasks include removing unwanted sounds like coughs or background noise. WavePad offers tools for cutting, copying, and pasting audio segments, allowing you to trim silences or rearrange sections. You can use the selection tool to highlight the portions you want to edit and then use the cut, copy, paste, and delete options to modify the audio.
For noise reduction, explore WavePad’s noise reduction filter; experiment with the settings to find what works best for your audio. Remember to save your progress frequently to avoid losing your work.
Adding Intro/Outro Music and Sound Effects
To enhance your podcast’s professionalism, consider adding intro and outro music. Import your chosen music files into WavePad. Precisely align them with the beginning and end of your recording. WavePad allows for precise adjustments to the audio timeline, ensuring seamless transitions. You can also incorporate sound effects from WavePad’s library or your own collection to add emphasis or create a specific atmosphere.
Remember to keep the volume of the music and sound effects balanced with your voice to maintain clarity.
Exporting Your Podcast
Once you’re satisfied with your edits, it’s time to export your podcast. WavePad supports a variety of audio formats. For podcast distribution, MP3 is a widely accepted standard. Select “Export” and choose MP3 as your output format. You can adjust the bitrate (quality) of your MP3; a higher bitrate results in better audio quality but a larger file size.
192 kbps is a good balance between quality and file size for most podcasts. Name your file appropriately, choose a location to save it, and click “Export.” Your podcast is now ready for distribution!
Advanced Techniques for Audio Restoration in WavePad

WavePad offers a surprisingly robust set of tools for audio restoration, going beyond simple noise reduction. Mastering these advanced techniques can transform a crackling, distorted recording into something listenable, even preserving historical audio or rescuing a damaged voice memo. This section dives into some of the more powerful features and strategies for achieving professional-level results.
Effective audio restoration in WavePad often involves a multi-step process, combining different tools and techniques to address specific problems. It’s rarely a one-size-fits-all solution; understanding the nature of the audio damage is crucial for selecting the appropriate approach. For instance, dealing with clicks and pops differs significantly from tackling consistent background hiss.
Noise Reduction Techniques
WavePad’s noise reduction tool is your first line of defense against unwanted background sounds. The effectiveness depends heavily on accurately selecting a noise profile. Before applying noise reduction, it’s essential to isolate a section of the audio containingonly* the noise—no speech or music. This “noise print” allows WavePad to effectively identify and attenuate similar noise throughout the entire track.
Experiment with different reduction levels; too much can lead to artifacts or a muffled sound, while too little leaves the noise relatively unaffected. A good starting point is often around 10-15dB, adjusting incrementally based on the results. Remember to preview your changes frequently to avoid over-processing.
Click and Pop Removal
Clicks and pops, often caused by scratches on vinyl records or imperfections in digital recordings, can be significantly reduced using WavePad’s restoration tools. These tools often employ algorithms that identify and replace short bursts of high-amplitude noise with interpolated audio from surrounding samples. The strength of the repair is adjustable, allowing for a balance between removing the artifacts and preserving the integrity of the original audio.
A slightly less aggressive approach is generally preferable to avoid introducing artifacts that might sound worse than the original clicks.
Spectral Editing
For more complex restoration tasks, WavePad’s spectral editing capabilities provide a granular level of control. The spectral view displays the audio’s frequency components over time, allowing you to visually identify and remove unwanted frequencies or noise patterns. This is particularly useful for addressing specific frequency bands that contain noise not easily addressed by the general noise reduction tool. For example, a narrow band of hum at 60Hz can be surgically removed without affecting other frequencies.
This technique requires a good understanding of audio frequencies and some trial and error. However, the visual feedback provided by the spectral editor makes the process more intuitive than relying solely on algorithmic noise reduction.
Example: Restoring a Damaged Vinyl Recording
Imagine a recording of a vintage jazz performance with noticeable surface noise (hiss) and several pops and clicks. First, a noise print would be taken from a section containing only hiss. The noise reduction tool would be applied, followed by the click and pop removal function. Finally, spectral editing could be used to fine-tune the results, perhaps attenuating any remaining resonant frequencies that weren’t completely removed by the automated tools.
The “before” audio would be characterized by a prominent hiss and numerous pops, while the “after” audio would exhibit a significantly cleaner sound with much of the noise and artifacts removed, allowing the musical performance to shine through more clearly. The result is a substantial improvement in the audio quality, bringing the listener closer to the original performance.
Last Point
So, there you have it – a whirlwind tour of WavePad’s capabilities. Whether you’re a seasoned audio engineer or a complete newbie, WavePad offers a flexible and accessible platform for all your audio editing needs. From simple tweaks to complex projects, its user-friendly interface and powerful features make it a great choice for anyone looking to get creative with sound.
Go forth and edit!
Questions and Answers
Is WavePad free?
WavePad offers both free and paid versions. The free version has some limitations, while the paid version unlocks all features.
Can I use WavePad on a Mac?
Yes, WavePad is available for both Windows and macOS.
What’s the best way to learn WavePad?
Besides this guide, check out WavePad’s official website and YouTube for tutorials. There are also plenty of user-created tutorials online.
Does WavePad support VST plugins?
No, WavePad does not support VST plugins.
How much storage space does WavePad need?
The installation size is relatively small, but the space needed will depend on the size of your audio projects.